09-03 - LUI Installation
17 min
1. Install Windows
2. Setup Username, Password, Computer Name
- Username : LUI-USER
- Password : lui123
- Computer Name: CSCS-LUI
3. Setup IP Address ตาม System Diagram (Topology) พร้อม Rename Port Ethernet (LAN) เป็น LAN1_CSCS และ LAN2_SPARE
For Example:

4. Disable Firewall
- ไปที่ Control Panel > Windows Defender Firewall

- Advanced setting

- Windows Defender Firewall Properties

- เปลี่ยน Firewall State เป็น "Off" ทั้ง Domain Profile, Private Profile, Public Profile

5. Setup Power and Sleep

6. Set Region เป็น English (United Kingdom)

7. Install Sentinel HASP Driver และ Connect USB Dongle เข้าที่เครื่อง
8. Install Tardis2000
- Setup Tardis 2000 โดย Software จะอยู่ที่ C:/Windows/SysWOW64/Tardis.cpl
Note: Run as Administrator
- Disable the windows Time Service (ถ้ามีหน้าต่างถาม)

- กด Clear All (In Main menu)

- กด Add แล้วใส่ IP Address ของ GPS พร้อมระบุชื่อ GPS

- ปรับ Parameter ใน "Setting the time" Menu ตามรูป

- กด "Apply" แล้ว "OK"
9. สร้าง folder CSCS_Prj ที่ C:/ Drive

10. Copy Backup Configuration มาใส่ใน Folder CSCS_Prj ที่สร้างขึ้นมา
11. แก้ไข iControl.config ให้ iControl run เป็น client (กรณีใช้ Backup จากเครื่อง CPM)
- เปิด file iControl.config ที่อยู่ใน C:/CSCS_Prj/bin/ ด้วย notepad (หรือกดคลิ๊กขวาแล้วเลือก Edit in Notepad)
- search คำว่า <ClientServer> โดยใช้ Key "Ctrl+F"
- แก้ไข <rol>server</rol> ให้เป็น <rol>client</rol> พร้อมทั้งตรวจสอบ IP ของ CPM ที่ <primary.ip> และ <secondary.ip> ให้ถูกต้อง
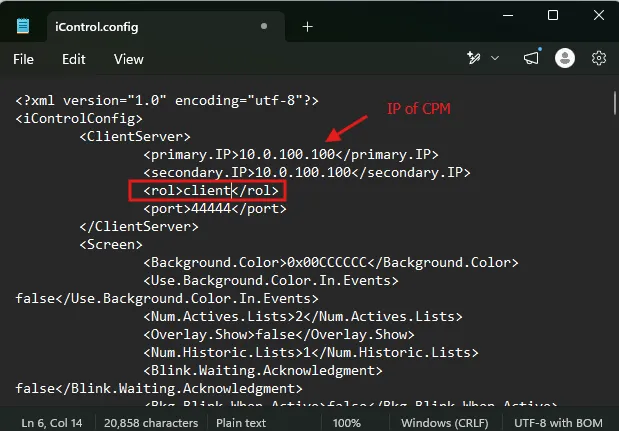
- Save ทับไฟล์เดิมโดยใช้ key "Ctrl+S"
12. Create Shortcut iControl.exe

13. ย้าย Shortcut ไปไว้บน Desktop พร้อมกับ rename ชื่อ
14. Run iControl Software
15. Share Folder C:/CSCS_Prj/logs/cscs_prj

16. Setup Auto Login สำหรับ Windows ตาม Link
17. Setup Auto start iControl software (at Startup)
- search run
- open shell:startup

- Create iControl.exe shortcut อีกครั้ง แล้ว copy ไปใส่ใน folder

18. Install AutoCopy.exe
- run AutoDelete.exe
- หลังจากติดตั้งเรียบร้อยจะมี folder AutoCopy ขึ้นใน Drive C:/
19. Setup AutoCopy
- เปิด File Setting.config ด้วย Notepad (C:/AutoCopy/Setting/Setting.Config)
- Set แต่ละ parameter ให้ถูกต้อง
- Save ทับ file เดิม
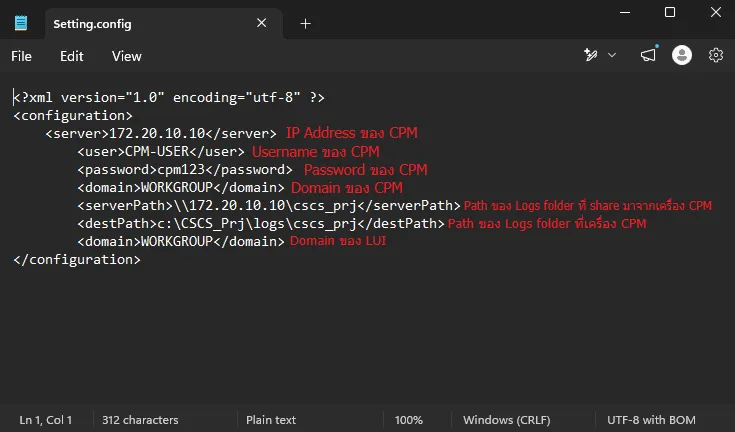
20. Install Load Report
- Copy folder LoadReport จาก Backup มาใส่ที่ Drive C:/
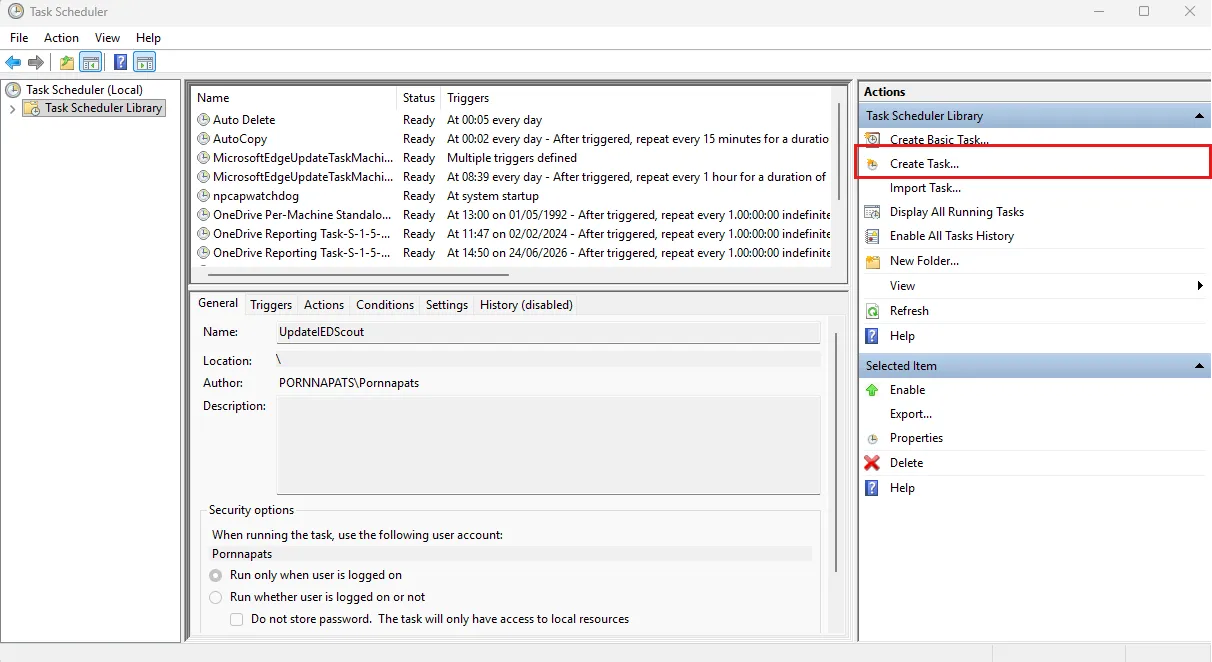
- เปิด Windows Task Scheduler และเพิ่ม Task สำหรับ Load Report
- กด Create Task... ทางด้านขวามือ
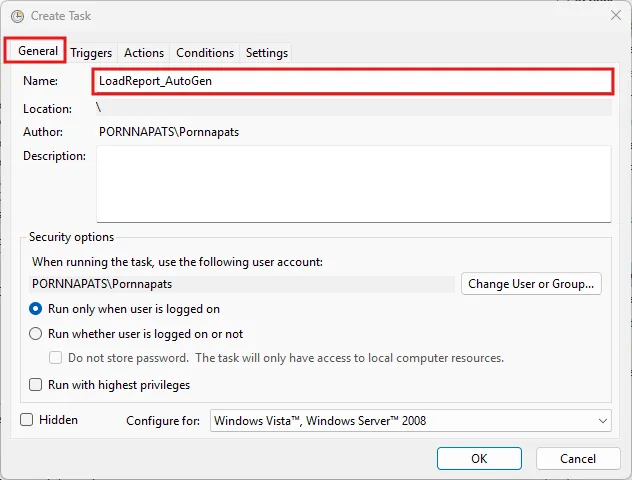
- ระบุชื่อ Task เช่น LoadReport_AutoGen ใน Tab: General
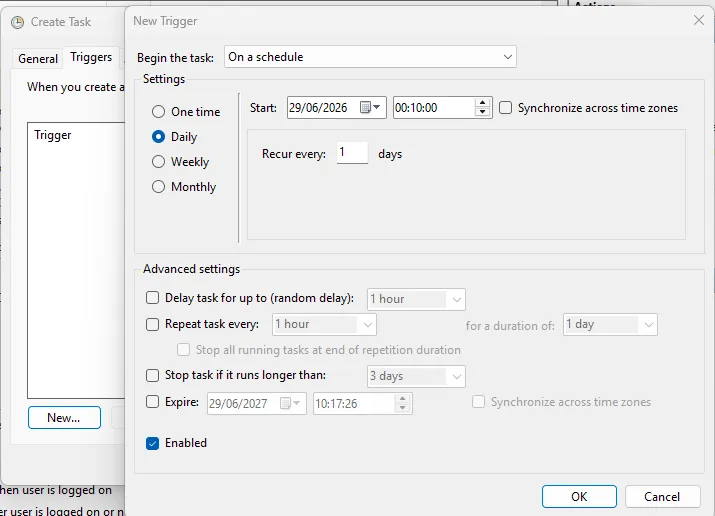
- กดที่ Tab: Triggers แล้วกด New...
- Set Daily, Start ตอน 00:10:00 และ Recur every 1 days
- กด OK เพื่อจบ Tab Triggers
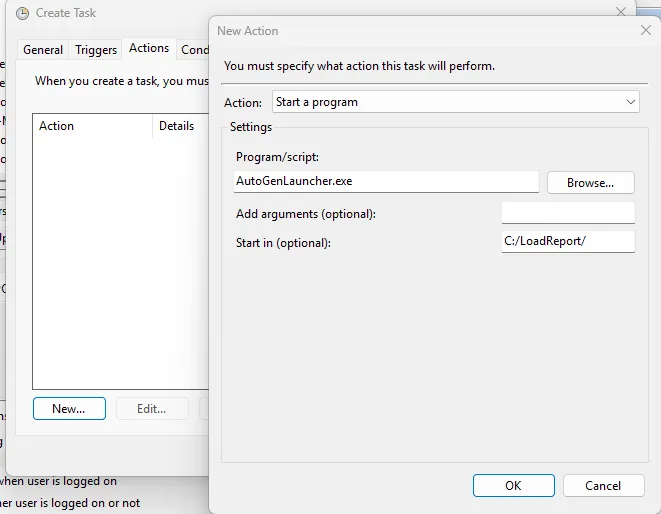
- เปิด Tab: Actions แล้วกด New...
- Set Action เป็น Start a program, ระบุ Program/script เป็น AutoGenLauncher.exe และ ระบุ Start in (optional) เป็น C:/LoadReport/ (หรือตำแหน่งของ LoadReport folder อื่น ถ้าอยู่คนละตำแหน่ง)
- กด OK เพื่อจบ Tab Actions
- กด OK อีกครั้งเพื่อ Save Task